
ASANA: tips and advice for your Chaturanga
Component of one of the most common variations of the sun salutation, chaturanga or the 4-limbs staff pose is certainly one of the most common postures in vinyasa yoga.
It is a demanding posture, but as it is often performed in the middle of a sequence and a bit like a transition, most students try somehow to do it, often thinking only of one thing: to land on the ground as quickly as possible.
However, by rushing, you can hurt yourself. So here are some useful tips to be able to practice this fundamental posture full of benefits.
The benefits of chaturanga
Chaturanga is a powerful posture that will allow you to strengthen your arms, wrists, shoulders, core, legs and back muscles.
Put shortly, it is a great pose to improve your general posture, but also to prepare your arm balances!
Tips to practice chaturanga
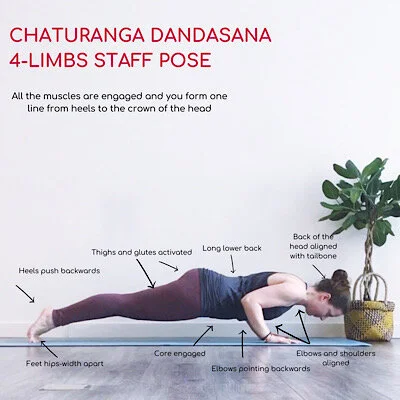
Let’a figure out the posture: chaturanga dandasana is a stick - formed by the entire body from head to toes - resting on 4 limbs - hands and feet - with the elbows bent.
First of all, you will need to make sure you have solid foundations: hands spread shoulder-width apart with wrists under them and feet hip-width apart.
Then, as the posture tends to put a lot of weight on the arms and that it is generally practiced by going down from plank to the ground, by reflex, we tend to release every muscles when we bend our elbows.
But as we have just seen, the body must be like a stick. This is one of the tips to remember for a comfortable chaturanga.
For this reason, the muscles have to be engaged, otherwise the body becomes like a spaghetti, which will have the consequence of making the posture almost impossible.
So, to make a beautiful stick with your body, you have to engage:
the leg muscles, especially the front of the thighs and the glutes
the core
the back muscles
At the same time, you will stretch the body from the heels to the top of the head. This allows the weight to be distributed more evenly between the feet and the arms and thus to feel lighter.
This engagement and this extension will also prevent the pelvis from being too high in relation to the shoulders and the lower back from arching too much.
Once the body looks like a beautiful long stick, it becomes easier to bend the elbows to practice the full posture.
However, often when students begin to bend the elbows the following things tend to happen:
the lower back arches
the shoulders rotate forwards and/or downwards
the elbows splay out
To counteract this, when you start to bend your elbows, lengthen your body and engage your legs and your core even more to form a solid block. This will keep your lower back from collapsing.
Also, before bending your elbows, always make sure to stabilize the shoulder joints so that the head of the shoulder does not rotate towards the mat. To do this, I advise you:
to press firmly in your arms to round your upper back and keep your shoulder blades away from each other. You will feel the muscles around your ribs activate.
to push your shoulders back from the top of your arms to feel that your arms and shoulders are firmly connected. This action will activate the muscles in the middle of your shoulder blades.
to shift your weight slightly forward, letting your shoulders be in front of your wrists (be careful not to go too far) just before bending your elbows.
Then, to prevent your elbows from splaying out, engage the muscles in the back of your arms and tighten them towards the ribs, pointing them towards the back of the mat.
At this point, there is one last thing to watch out for: your shoulders should not go too low.
Keep in mind that in the full expression of the posture the upper arms remain parallel to the ground, which means that the shoulders remain in line with the elbows. They don't go any lower. Besides, you don't even have to go that low to feel the benefits of the posture. The simple fact of bending the elbows even a little while engaging the rest of the body is enough.
Extra tip: use your breath to help support your body weight. Each time you breathe in, lengthen and engage your body a little more. This will lighten you. And on the exhalation, do not relax the muscles, but activate them even more, especially your core muscles.
Some possible modifications
Chaturanga is really not an easy posture, but you can make it more accessible.
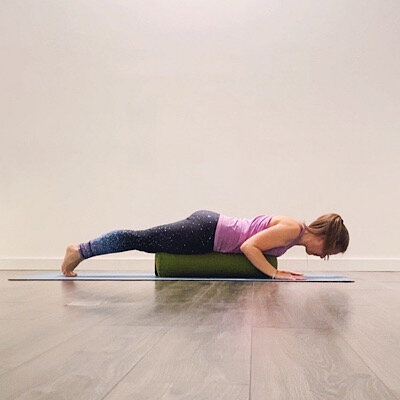
If you feel that you do not yet have enough strength in general, you can first practice it by placing a bolster under your trunk. In this variation, you will focus on aligning your body and activating your arms and legs by pressing your hands and toes firmly into the ground.
If you have more difficulty with your core, do not hesitate to do chaturanga knees on the ground and to focus on the activation of your abs.
Finally, if you feel that you have more problems with the alignment of your shoulders, practice the posture by placing a block under each of them.
Contraindications?
If you have wrist or shoulder pain, the full posture will be complicated. It should even be avoided or done with modifications.
Lower back pain can also prevent you from practicing chaturanga, especially if you cannot properly activate your core muscles.
This posture is also not recommended in its full version if you are pregnant.
And you ? What is your chaturanga experience? Do not hesitate to share it by commenting below!