
Matsyasana or Fish pose: tips and advice
The legend of the Lord of the fishes
Legend has it that the God Shiva, after years of meditation, came down from Mount Kailash to meet his wife Parvati and tell her of his discovery.
They met at the edge of a river where he began to explain to her that he had discovered the secret of deliverance: yoga.
He taught her the different aspects of this path.
A fish, Matsya (in Sanskrit, the term matsya means fish), swimming nearby heard Shiva speak.
He stopped and listened carefully.
As Shiva gave his explanations, Matsya was drawn out of the water and took the form of a human.
Seeing this, Shiva renamed Matsya to Matsyendranath - the king of fishes - and he gave him the mission of teaching the path of yoga to all who wanted it.
Thus, Shiva became the first yoga master (guru) and Matsy the first yoga student (yogi).
Matsya or Matsyendranath therefore represents the lineage of all yoga teachers.
From this legend were born 2 postures:
matsyasana: the fish pose and
matsyendrasana: the pose of the lord of fishes
In this article, we will focus on the fish pose, matsyasana.
Matsyasana: the fish pose
Fish pose is a backbend.
Traditionally, it is done with the legs in lotus position (which represents the tail of the fish): the myth wants that in this shape, it is possible to float on the water (I admit that I have not verified if that’s correct ;) ).
As the lotus pose is not accessible for everyone, fish pose is very often done with the legs stretched out and tight against each other.
There are plenty of other variations of this posture in which the following different positions can be mixed: cross-legged, legs in half-lotus, legs stretched and tight together lifted off the floor, hands under the buttocks, hands next to the hips or the palms of the hands together with straight arms pointing at 45 ° toward the sky.
Basically anything is possible as long as the chest is open towards the sky!
The benefits of fish pose
Matsyasana is an energizing posture that will help you strengthen your arms, stimulate your back muscles, loosen your neck, and stretch the front of your spine.
Thanks to the opening of the chest, your breathing capacity will increase. As a result, it is a very good posture to prepare for breathing exercises (pranayama).
It will also stimulate your abdominal organs, improve blood circulation in your head (the heart is usually higher than your head) and stimulate your thyroid, helping your endocrine system to function better.
Note: this posture is often practiced after shoulderstand, because it allows in to open the throat again.
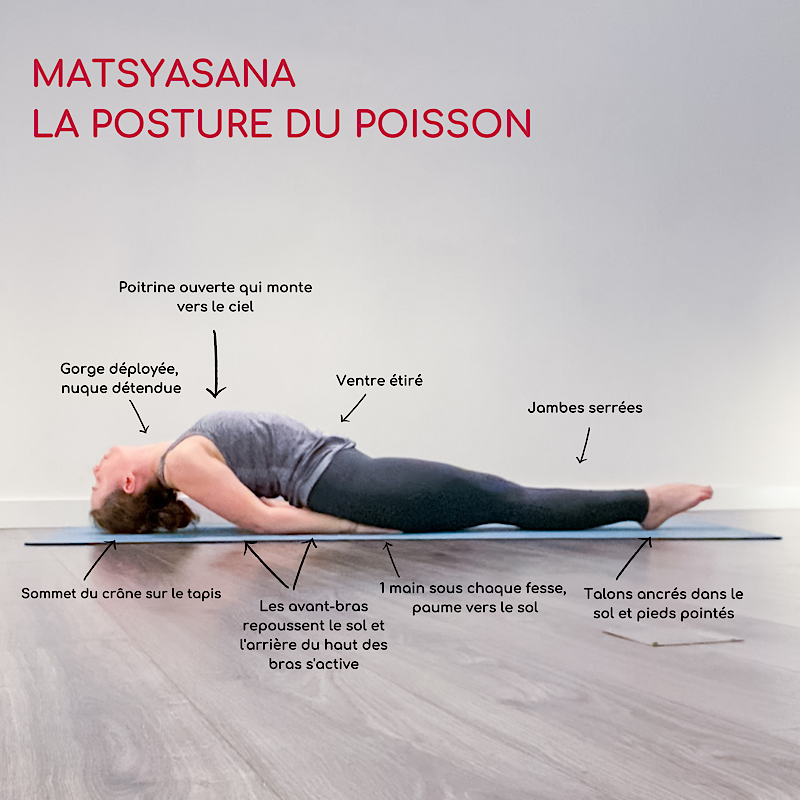
Tips for a nice fish pose
With all its variations, it's hard to list all the tips related to each one, but here are the main tips for the basic version:
the posture is a back bend. We want to stretch the entire front of the torso and open the chest by lifting it as high as possible. To help you, you can place a block or a pillow under the bottom of your shoulder blades (at the diaphragm level).
the support is on the forearms. Focus on pushing off the floor with your forearms to engage your triceps (the backs of your upper arms).
to allow a good seat on the forearms, keep your elbows close to the body.
the hands can be under each buttock or next to the hips. In both cases, the palms are turned towards the ground.
the head touches the ground or not. It all depends on the mobility of your neck. If you want, you can place a block under the top of your head. if your neck is very stiff, it is better to keep your chin on your chest.
bring your shoulder blades together, using the muscles in the middle of your upper back to open your shoulders and chest.
keep the neck long with the shoulders away from the ears.
Some extra tip: use your inhalation to help your chest open up to the sky.
Why not a more relaxing version?
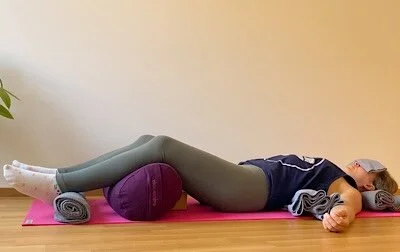
There is a “restorative” version of the fish pose.
It requires a few accessories, but then you can hold it for 15-20 minutes (this is how long it takes your nervous system to go into a real relaxation mode).
If you don't have specific yoga materials, you will need 5 blankets and a sock or scarf.
If you have yoga props, you will need 1 bolster, 3 blankets and an eye pillow.
Installation in “home” version:
1 blanket is rolled up to 1/3 and placed so as to have the head on the flat part and the last cervical (C7) supported by the rolled up part.
1 other blanket is folded like an accordion. You will place the lower part of your shoulder blades (diaphragm region) on this accordion.
2 blankets are rolled into each other to create a big sausage to place under your knees.
1 last blanket can be rolled up and placed under the ankles
the sock or scarf is placed over your eyes
Installation in “yoga” version:
Just the same as for the "home" installation, except that the 2 blankets rolled up into each other are replaced by the bolster and the sock or scarf is replaced by the eye cushion.
See the illustration below.
In both cases, the chest is higher than the head, even if it is not by much (we are looking for the inversion).
In addition, the accordion blanket is placed such that the last ribs are open (so well below the diaphragm) to create the backbend.
Once you're in the position your gone for a 15-20 minute journey! Start by lengthening your breath. Then note how your body is supported by the props and how you can let yourself go on them. Focus on the sensations of your body and let yourself be rocked by your breathing.
The contraindications?
The posture is an inversion that will bring a little more blood flow to your head. It is therefore not very recommended if you have migraine or blood pressure issues.
As it stimulates the abdominal and reproductive organs, it should not be done during the period of heavy menstruation or during pregnancy.
Finally, you will also avoid it in case of neck pain.